
N.T. Dreaming!
Introduction
If you have already booked your holiday with us, thanks for choosing our van for your next adventure!
If you have would like to rent our van to explore the Northern Territory, you can do so at Camplify.
This information is designed to orientate those hiring the camper van so you are best prepared for your holiday. Reading this information will speed up the handover of the van when you collect it, and will help you avert damaging any items. You may also wish to take screen shots on your phone of some of the key information provided below so that you can refer to it whilst you are away (understanding you may not have reception when you are camping). The videos provided aim to complement the text by giving you some visual idea of how the items work. Whilst the videos are not of this specific van, any major differences in the van’s amenities from the video have been identified. When you collect the vehicle, you will also have an opportunity to test aspects of the van and ask any questions you may have.
Contents
Packing: what to bring
Awning: opening awning, closing awning, fitting anti-flap kit, fitting privacy screen
Cooking: gas stove, induction stove, cookware, cutlery, crockery, pantry, fridge, freezer
Cooling: air conditioning, multi-directional fan, ceiling fan, oscillating fans
Tables and chairs: dining table, kitchen benches, passenger table, and outdoor table and chairs
Bedding: bed linen, king bed, bunk beds, triple and twin single beds
Front cab: driving, navigation, rear view camera and GPS, air conditioning, coffee table, music and hands free, travel information
Helpful locations: camper van collection and drop off, supermarket, bottle shop, car wash, diesel fuel station
Itinerary ideas: nature’s way, Litchfield, Kakadu, Katherine and what to do in Darwin.
Packing
If possible, pack your things in soft bags (not suitcases). That way, once you unpack your personal items into the van, you can easily fold up and stow away your bags during your trip. There are two overhead storage cabinets designed to carry clothes and personal items. Packing cubes are generally the easiest way to store and access your items in the cabinets. The van includes 4 large canvas zip-up packing cubes for this purpose.
The van is equiped with basically everything you might need for you holiday including bath towels, bed linen, pillows and mosquito spray. The only things you need to bring are your clothes and toiletries. If you are unsure about the need to bring anything feel free to ask.
2. Awning

Eating ice blocks under the awning
Opening and closing the awning
Awnings are the most commonly broken items on hired camper vans, and they can be costly to repair and replace. However, a few simple tips can keep you out of trouble:
Avoid using the awning when there is any kind of wind. The wind easily catches under the awning and will quickly damage the arms.
Pack away the awning when the van is unattended, for example, retract the awning before leaving to go for a walk or for a swim in the pool etc.
Peg the legs of the awning down at their base, and also peg out a guide rope to hold down each leg.
Use the anti-flap braces. If you are stopping for 10 minutes to have lunch under the awning and the weather is calm then you won’t use these. However, if you are putting out the awning for a more extended period of time, or there is some breeze, then the anti-flap braces should be fitted to keep it firm.
The switch for the electric awning is located on the front side of the bench seat, just behind the van’s sliding door, and is labeled ‘Awning’. Pushing the switch down sends the awning out. The up position draws the awning in. Pushing the switch into the centre position stops the awning from moving either way. The awning will automatically stop moving when it reaches the fully open or closed positions.
How to set up the electric awning
How to close the electric awning
Awning anti-flap kit
How to fit the anti-flap kit to the awning
The anti-flap kit is kept in a large grey canvas bag under the back right (driver’s side) bench seat of the van. A hammer, pegs and guide ropes are stored in a clear plastic bag, along with the awning privacy screen, under the back centre bench seat. All these items are accessed through the van’s rear doors.
The video explains how to set up the anti-flap kit. The anti-flap kit for this camper van awning has 2 key differences to the video explanation provided:
The end of the side rails have a plastic hook (instead of a pin) and hook onto the edge of the awning rail
The central curved support has 2 detachable rubber ends. These push out against each side of the awning. Be careful to keep the rubber ends attached when packing them away.
Feel free to clarify these differences and ask any questions about how to use the awning during your orientation.
Awning floor (or shade screen)
How to set up the privacy screen
The van comes with a black mesh mat that can be used as a floor under the awning. Alternatively, it can be fitted to the awning to provide further shelter from sun and rain as well as increased privacy. This video gives you an idea of how this works. A small bag is included with hammer, pegs and guide ropes for this purpose.
3. Cooking
Gas stove
How to use a butane camping stove
The van is equipped with two portable single burner butane gas stoves, stored in carry cases under the centre back bench seat of the van. This video outlines how to use the stove. Butane gas canisters are supplied for each stove. Each canister will last around 1.5 hours on high flame or 3 hours on low flame. The van comes with additional canisters for you to use during your trip. Further canisters can also be purchased from supermarkets (Woolworths) or camping stores if desired. The gas stoves are designed for outdoor use. An induction stove is available for indoor use.
Induction stove
An induction stove is kept in the box under the rear passenger seats. This stove is only operational when the van is connected to 240v. The stove can be plugged into the wall socket behind the kitchen sink and then used on the kitchen bench top. The ceiling exhaust fan should be turned on when using the induction stove (see fans below).
Cookware, cutlery, crockery and pantry
Cookware is kept, along with the induction stove, in boxes under the rear passenger seats. This includes large and small non-stick pots with lids, a non-stick fry pan, a cast iron griddle, a double jaffle iron, a gas burner toaster, and a kettle. Cooking implements like sharp knives, tongs, spatula, large spoons, salad servers etc are kept under the rear driver’s side bench seat (directly opposite the van’s sliding door). Cutlery, cups, glasses, coasters and bowls are also kept under this same seat. Dinner plates, along with basic pantry items like tea, coffee, milk, herbs and spices, are kept in the overhead storage above the rear passenger seats.
Coffee
An Aeropress is provided for making coffee. The video below demonstrates how to use it. Good quality, ground coffee is included in the pantry.
How to use an Aeropress
Fridge and freezer
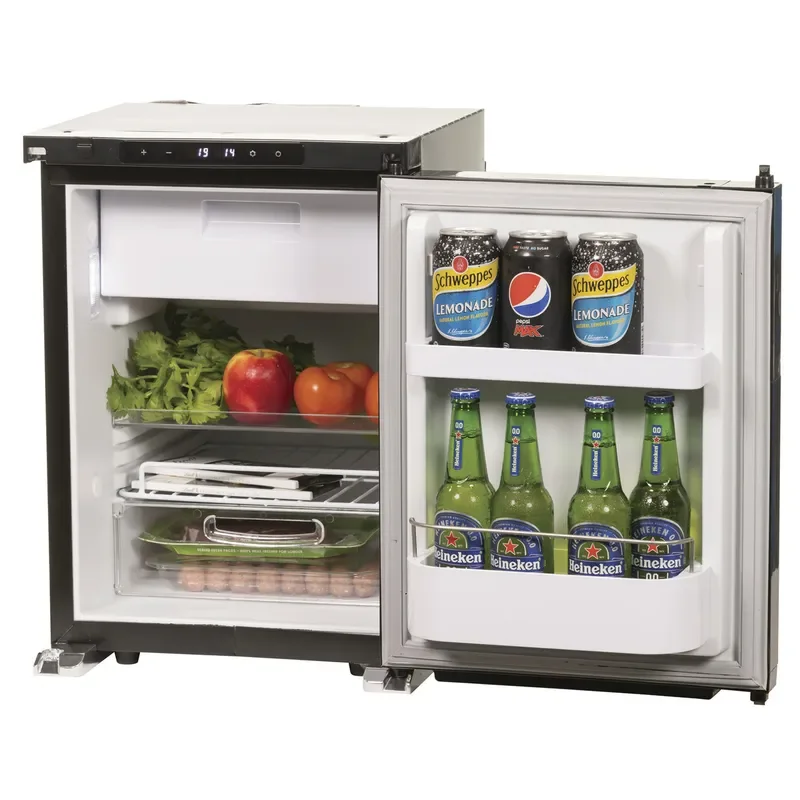
A 40 litre Brass Monkey upright fridge/freezer is located under the rear driver’s side bench seat (directly opposite the van’s sliding door). The temperature of the fridge can be controlled using the buttons at the top of the fridge. You can set the temperature of either the fridge or the freezer but not both. Generally the fridge is best set between 0 and 2 degrees and the freezer box will continue to operate as a freezer.
A 50 litre Brass monkey upright fridge/freezer is located under the passenger side bench seat (next to the van’s sliding door). This fridge/freezer is adjusted in the same manner as the 40 litre one.
It is also possible to set the entirety of one of the fridges to be a freezer if you prefer. The fridge manual can be downloaded here.
4. Cooling
Air conditioning
The van is fitted with ducted air conditioning that is channeled out of 3 vents under the over-head storage. Each of the vents can be angled to change the direction of the air moving around the van. The air conditioning only works when plugged into 240v power (i.e. it can not be operated from the solar battery system). The settings on the air conditioner are controlled using a remote located on the wall behind the rear passenger seats. The remote must be pointed at the sensor (located on the wall above the remote) in order to work. The air conditioner cools the van quickly and can be left on overnight. When set to automatically maintain the temperature, the fan will operate continuously regardless of the temperature. The blue light on the sensor will turn on to show that the air conditioner is in cooling mode, and turn off when the air conditioner is in fan mode because the van has reached the desired set temperature.
Multi-directional fan
The van is fitted with multiple fans to keep you cool. The white Sirocco fan is fitted in the main bed/living area. It has 3 speeds and also a timer feature that allows it to turn off automatically after 3, 6, 9 or 12 hours. This fan draws low power and is very quiet and can be used through the night whilst sleeping. The fan is fully adjustable, by unlocking and locking the latch on the bottom of the fan.

The white Sirocco fan is located at the back corner of the driver’s side wall, under the overhead storage.
How to use the Sirocco fan
Ceiling fan
The Maxxair Deluxe ceiling fan is fitted to the roof of the fan. It has 10 speeds. It is reversible, so it can draw cool air into the van, or it can operate as an exhaust fan (for example if you were cooking inside the van) to blow air out of the van. The fan can be used with the vent open or closed and can also be used in the open position when it is raining. The fan can be operated by remote control, located on the wall just inside the sliding door, underneath the light switches.

Maxxair deluxe fan located on the ceiling, with black remote located on the wall by the sliding door.
How to use the Maxxair Deluxe ceiling fan
Oscillating fans
Multiple oscillating fans are provided in the van. One fan is provided in the front passenger seat. A second is attached just behind the drivers seat, facing the back of the van in order to cool the two rear passengers. These fans have 3 settings - low, high and off. The knob on the top of the fan can be used to hold the fan stationary or to release it to oscillate back and forth.
5. Tables and chairs
Indoor dining table
The central indoor dining table is called a Lagun table and can swivel to multiple positions as well as being height adjustable. The video below shows how to adjust the Lagun table. It is important to tie the table off before driving to prevent it from swivelling around and causing damage when the van is moving. The table can be tied off to the side of the van using the velcro strap. The Lagun table can be packed down to make the King size bed. To do this, loosen the black handle at the corner where the vertical and horizontal arms of the table meet. Then, slide the horizontal arm off the vertical arm of the table (you can keep the horizontal arm attached to the back of the table). Then loosen the black handle at the wall of the vertical arm of the table and slide the vertical arm out. You can now attach this vertical arm onto the back plate of the table so that both arms are secured to the back of the table top. Lay the table top down between the two rear bench seats, resting it on the support rails. It should fit snugly beside the two square acacia panels that are already between the bench seats, completing the King size bed supports.

Dining table
How to adjust the Lagun swivel table

Dining table
Kitchen bench tables
The kitchen bench has two flap up extendable tables. The smaller table can be flapped up and locked in place using the sliding bolt (the front passenger seat needs to be moved forward in order to engage this table). To pack it away, simply undo the sliding bolt and let it flap down freely. The large table can be engaged by first undoing the sliding bolt on the wall beneath it. The table can then be flapped up and locked into place using the support leg and sliding metal clasp. The clasp should stick over the leg to prevent it from flapping down if it is knocked. To pack it away, simply slide back the clasp, fold down the support leg, and flap down the table, locking it off using the sliding bolt again.

Large kitchen bench table
Rear passenger table
The table for the rear passengers can be engaged by undoing the sliding bolt at the floor (you may need to adjust the front driver’s seat in order to lift the rear passenger table into place). The table is flapped up and locked into place using the support leg and sliding metal clasp (like the kitchen bench table). The clasp should stick over the leg to prevent it from flapping down if it is knocked. To pack it away, simply slide back the clasp, fold down the support leg, and flap down the table, locking it off using the sliding bolt again.

Rear passenger table
Outdoor dining table and chairs
A large plastic outdoor folding dining table is located under the back left (passenger side) bench seat and accessed via the rear van doors. Unlatch the small hinged door to slide out the table. The video demonstrates how to open and close the outdoor table. A table cloth is located in the linen cupboard above the front cab. When sliding the table in and out, be careful not to catch it on the camp chairs located next to it. When packing away the table, it is often easier to slide the table in first, before sliding in the camp chairs. Outdoor camping chairs are provided for each person. These are located next to the outdoor table and can be accessed either through the back doors of the van, or by opening up the top of the bench seat. When packing away 4 camping chairs, it may be easier to open the bench seat to fit them in, rather than sliding them in the back.

Outdoor dining table and chairs
How to open and close the outdoor table
6. Bedding
The van has several bed layouts. It has two small bunks at the front. As well as a King size bed at the rear, which has the option of being set up as three slim single beds (or twin single beds) instead.
Linen
Bed linen is located in the storage cupboard above the front cab and is provided for the bed configuration you choose. It can include a king size mattress protector, king size sheet set and king size blanket. Or it can include two or three single sheet sets with blankets. Each bunk includes a cotton inner sheet and blanket. 4 pillows and 2 cushions are also included and kept on the rear bench seats.
King bed
The rear section of the van can be turned into a King size bed. This is done in a few easy steps:
First, open the rear doors of the van and remove the rear square wooden acacia panel from the central storage seat. Place this square panel up on top between the two rear bench seats, next to its counterpart acacia square panel. You can leave the rear plywood panel in place to hold the storage where it is.
Second, pack down the Lagun table. To do this, loosen the black handle at the corner where the vertical and horizontal arms of the table meet. Then, slide the horizontal arm off the vertical arm of the table (you can keep the horizontal arm attached to the back of the table). Then loosen the black handle at the wall of the vertical arm of the table and slide the vertical arm out. You can now attach this vertical arm onto the back plate of the table so that both arms are secured to the back of the table top. Lay the table top down between the two rear bench seats, resting it on the support rails. It should fit snugly beside the two square acacia panels that are already between the bench seats, completing the King size bed supports.
Remove the back cushions from the bench seats and place them on top of the central acacia panels. Add smaller cushions to the end as needed to complete the King size bed.
Fit the King size mattress protector (located in the linen cupboard above the van cabin) over all the cushions. This will help make the bed comfortable.
If you requested linen, then you can fit the King size sheets, blanket and pillows (also located in the linen cupboard above the van cabin).

King bed
Bunk beds
The two canvas bunk beds can be easily installed above the passenger seats and kitchen bench. These beds are strong enough to hold an adult but are most suitable for children due to their narrow size and limited length. The top bunk is 165cm long and 43cm wide. The bottom bunk is 125cm long and 43cm wide. The bottom bunk has the back of the driver’s seat and the back of the passenger seat on either side to prevent children from falling out. The top bunk has hooks to attach mesh supports on both sides of the bed for safety. To install the beds:
First, ensure the front seats have been moved forward and upright so as to provide room to install the bunks. You may also wish to pull across the front cabin curtains for privacy.
Second, remove the rolled up beds from their storage under the rear bench seat on the drivers side (the beds can slide out the rear doors of the van, or you can open the section of bench above them from inside the van).
Unroll the canvas beds. Insert each of the bottom bunk bed poles first into the wall under the kitchen bench and then into the driver’s side wall supports, removing and returning the black metal lock bolts for each of the poles.
Insert the top bunk bed poles into the drivers side wall supports first, and then into passenger side wall supports second, once again removing and returning each of the metal lock bolts. Be careful not to catch the poles on the kitchen tap (which should be turned out of the way, flush against the wall).
Each of the top bunk mesh screens have loops that can be latched onto hooks above the bed. A piece of cord white can be latched and unlatched to allow the person on the top bunk to enter and leave the bunk. You may wish to open the freezer to provide a step for the person on the top bunk to more easily climb up onto the kitchen bench and into their bed.
If you ordered linen for the bunk beds then you can fit the cotton sleeping bag liners and blankets (located in the linen cupboard above the front cabin).
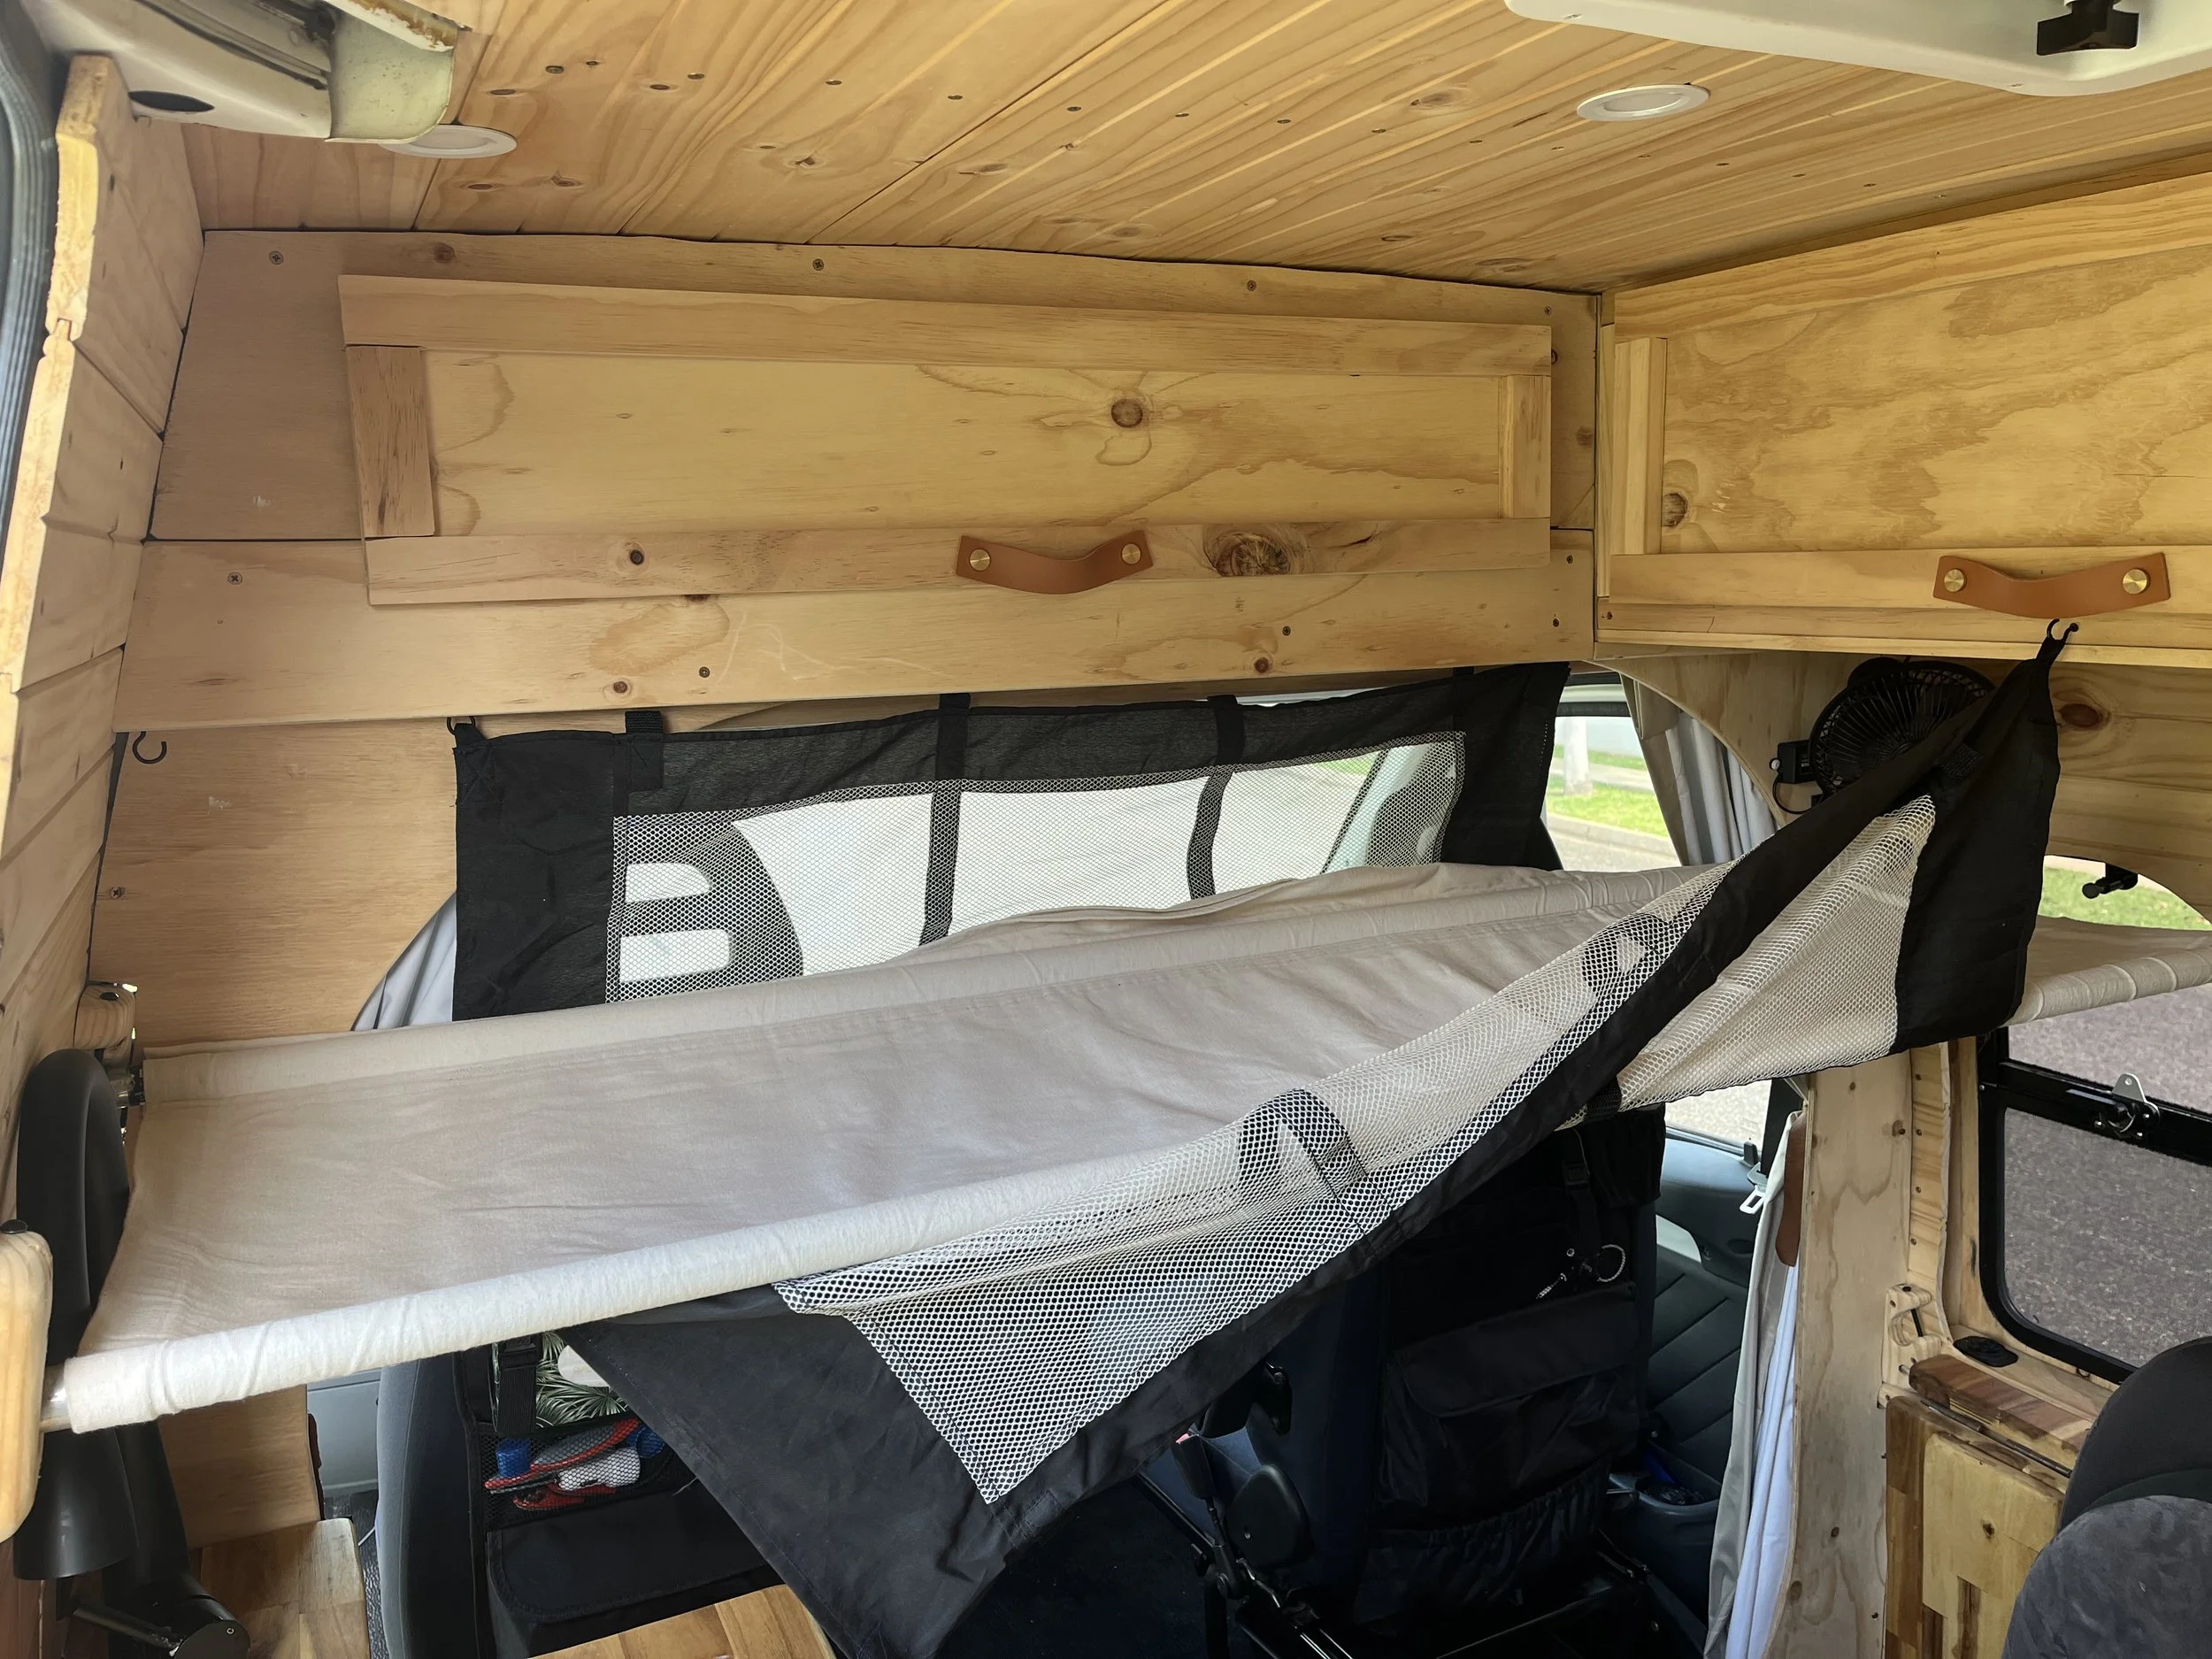
Top bunk without bedding

Top bunk with mesh side safety barriers

Top bunk with bedding

Sleeping on the bottom bunk
Triple and twin single beds
The rear of the van can also be configured into two or three slim single beds (instead of the King size bed). Each of these beds can accomodate an average sized adult. Each of the beds are the same length as a King size bed (around 2 metres) and about 60cm wide. To set up the 3 single beds:
First, pack down the Lagun table. To do this, loosen the black handle at the corner where the vertical and horizontal arms of the table meet. Then, slide the horizontal arm off the vertical arm of the table (you can keep the horizontal arm attached to the back of the table). Then loosen the black handle at the wall of the vertical arm of the table and slide the vertical arm out. You can now attach this vertical arm onto the back plate of the table so that both arms are secured to the back of the table top. The table can now be stored out of the way. If you are not using the front bunks, you may wish to store the Lagun table in front of the passenger seat. If you are using the front bunks, you may wish to lean it up against the kitchen bench.
Second, remove the back cushions from the two bench seats. The two bench seats are now ready to use as two beds.
If you wish to use the third single bed then you need to remove the items from the central storage seat, in order to clear the space between the two bench seats. To do this, open the rear doors of the van and remove the rear square wooden acacia panel from the central storage seat and place it out of the way (possibly in front of the rear passenger seats or leaning up against the kitchen bench). Then, empty out the storage cube (perhaps placing items on the rear passenger seats or wherever they fit best in the van). Then remove the top acacia panel and rear plywood panel and place them out of the way with the rear panel. The floor space between the two bench seats should now be clear. Place the back cushions from the two bench seats on the cleared floor space.
The three single beds are now ready to use. If you requested linen for the triple single beds then you can fit the three cotton sleeping bag liners with blankets and pillows (located in the linen cupboard above the front cabin).

Triple single beds

Twin single beds

Triple single beds

Twin single beds
Front cab bed
An additional bed can be formed in the front cab. The front seats are pushed back and hand rests raised. A wooden support is laid across the front seats with a mattress atop. The bed is 170cm long and measures 60cm wide at the head, tapering to about 30cm wide at the feet by the steering wheel. Black out blinds are available for the windscreen and side windows to keep it dark, cool and private.
7. Front cab
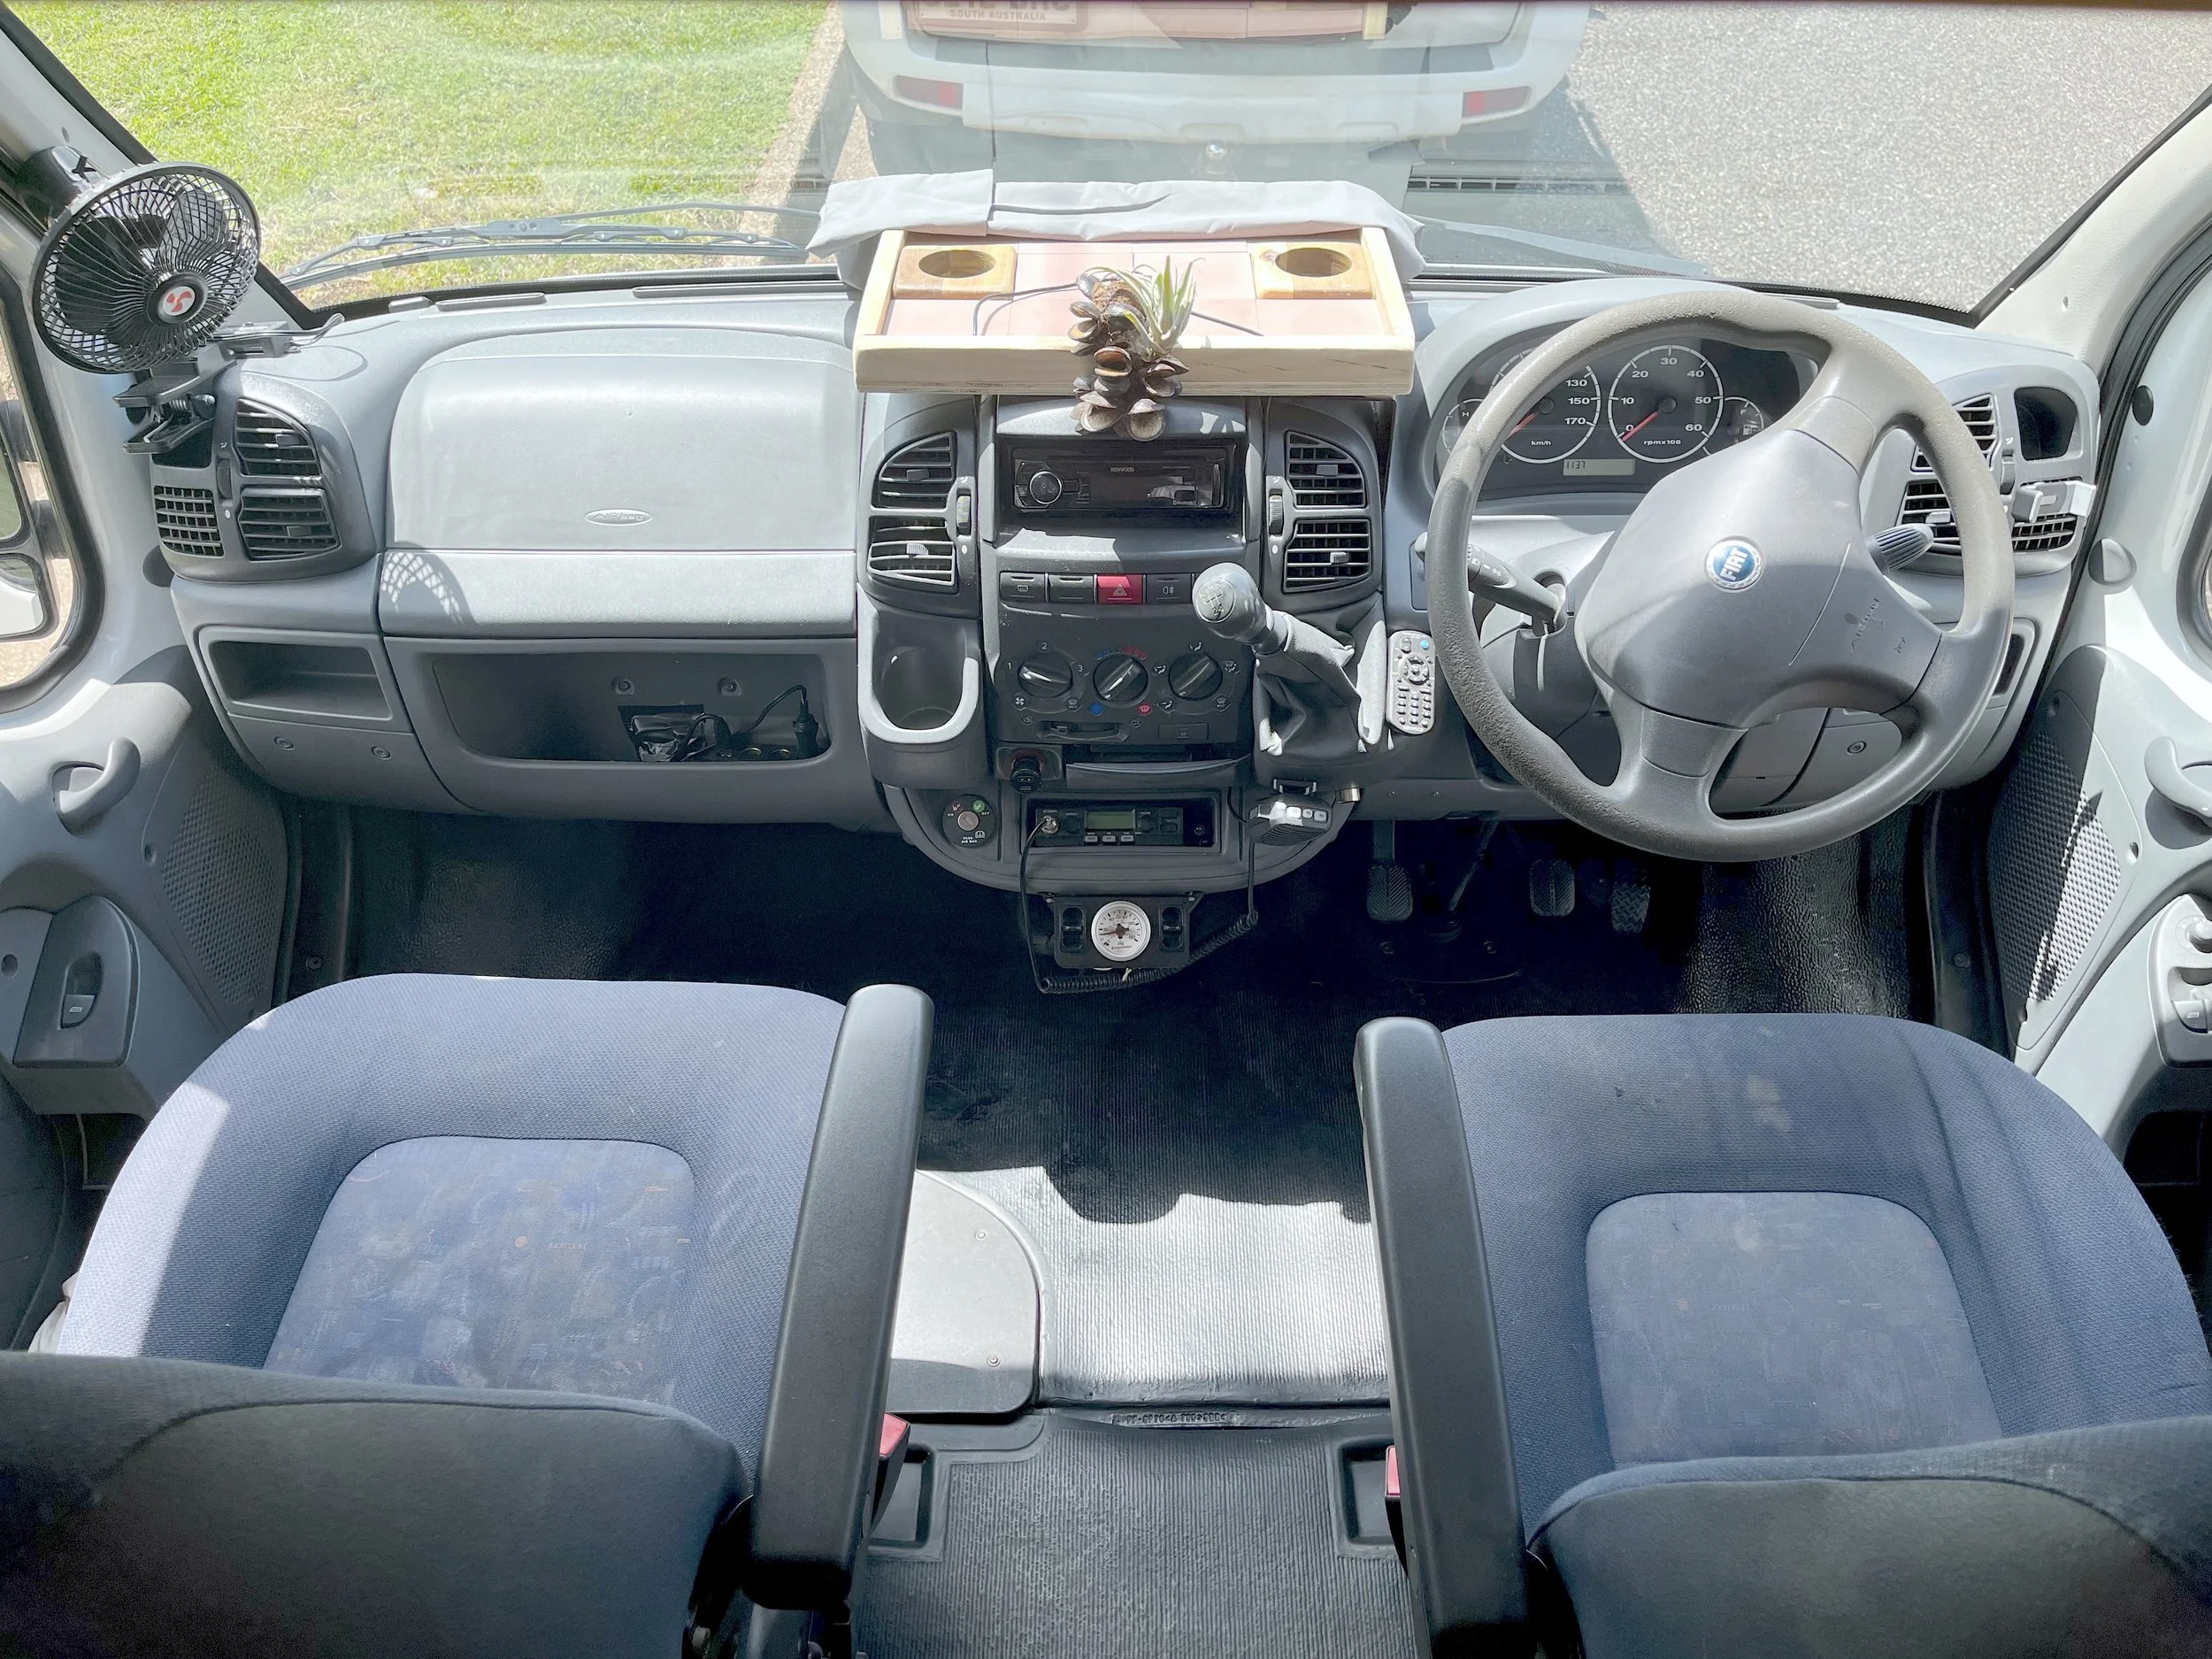
The front cab area
Driving
The van is a 5 speed manual. To enter reverse, use your fingers to lift the plastic slider under the head of the gear stick and move the stick to the top far left (where you would usually find first gear). Headlights and indicators are on the left of the steering wheel and wipers on the right. The hand brake is located to the right of the drivers seat. Hazzard lights are turned on by pressing the red button in the centre of the console.
Navigation
A mobile phone holder is located on the air vent to the right of the steering wheel. A magnetic phone holder is also located between the air vent and the steering wheel. A charging cable is available to charge a phone using either holder whilst you drive. The holders allow you to use navigational apps, like Google Maps, whilst driving.
Rear view camera and GPS
The review view mirror utilises a rear view camera. The camera turns on automatically when the car is started and remains on continuously whilst driving, allowing you to easily see vehicles on the road behind you. The camera can be adjusted up or down using the touch screen on the mirror. Swiping left or right on the touch screen moves the camera from rear view mode to dash cam mode. The rear view camera and dash camera are connected to a GPS sensor and record whilst driving in the event of a traffic incident.
Air conditioning
The air conditioner has 4 settings - 1, 2, 3, and Max. Usually the Max setting only blows air onto the windscreen. However, the air conditioner has been locked onto the face setting (ie it can not redirect air to the feet or windscreen) allowing you to utilise the maximum air conditioning setting to send air throughout the main cab. This can be particularly helpful to send cool air to those in the rear passenger seats. The passenger fan is also useful for moving cool air to the rear seats of the van. If you don’t have passengers in the rear seats, you may wish to close the cab curtains behind the front seats so as to more easily control the temperature in the front cab. Sometimes, if the air conditioning has been operating at a high level for extended periods of time, especially in locations with high humidity, some minor condensation can collect on the passenger side floor.
Coffee table
The tiled central coffee table provides a place to keep drinks, snacks and documents. It also includes 2 cables with micro, type C and lightning connections for charging devices. A grey cloth can be placed over the coffee table to protect devices from the heat or prevent the coffee table from reflecting on the windscreen. This cloth is located in the driver’s side door.
Music and hands free
The car stereo offers bluetooth connectivity allowing you to play music or podcasts from your mobile device or make phone calls. A USB and audio cable also provide direct connection to the stereo for mobile devices without the use of bluetooth. A portable UE Boom bluetooth stereo is available to play music in the rear of the van or outside the van when not travelling. The car stereo can also play CDs (if they still exist :) ) and includes a stereo remote control, located next to the gear stick with velcro. Further USB charging ports and 12v sockets are located on the front console and in the front passenger dash.
Travel information
A linen bag inside the front passenger door holds travel information including tourist brochures for Perth and the local national parks as well as a book detailing all the caravan sites and their facilities available in Western Australia.
8. Helpful locations
Camper van collection
Camper van pick up and drop off (unless otherwise arranged): 2/13 Stokes St, Parap, NT, 0820
Supermarkets, bottle shop, and camping stores
Woolworths Nightcliff is a 10 minute drive from the van pick up location (it is easier to park here than Woolworths Darwin City, which has covered parking that the van won’t fit under). Both of the Woolworths stores have a BWS. Alternatively, there is also a drive through BWS at Parap Tavern (one minute from the van pick up location). From Woolworths Nightcliff is it a 3 minute drive to the BCF and Anaconda camping stores located in Jape Village.
Car Wash
Paradise Car Wash (3 min drive from van drop off location): 58 Stuart Highway, Stuart Park, 0820. It is a high roof, self serve car wash, which will make it cheap and easy to wash the van.
Diesel fuel station
United Petroleum Parap (1 min drive from van drop off location): 209 Stuart Highway, Parap, 0820
9. Itinerary ideas
An excellent way to see the top end is via the Nature’s Way loop from Darwin to Litchfield to Katherine to Kakadu and back to Darwin. You can obviously do the loop in either direction, however if you are picking up the van later in the day you may wish to start at Litchfield (just over one hours drive), or alternatively you can head to Kakadu (Jabiru is a bit under three hours drive). Some fun stops along the way include:
Berry Springs: only 45 minutes from Darwin, Berry Springs is a popular place for swimming. You can also stay overnight at the nearby Tumbling Waters Holiday Park, which has a free outdoor cinema.
Litchfield National Park: hike around and swim in Wangi Falls, Florence Falls and Buley Rockhole. Unpowered camp sites can be booked at Florence Falls and powered sites (highly recommended to allow you to use the air conditioning) are available at Litchfield Tourist Park.
Katherine: if you wish to explore Katherine itself then you may wish to stay at the Breeze Holiday Park, where you can eat at the Fig Tree Bistro under a fig tree of fairly lights, go swimming at Katherine’s hot springs or take part in the Outback Experience. If you plan to focus your visit on the incredible Nitmiluk (Katherine) Gorge, you may wish to stay at Nitmiluk Caravan Park, where you can walk to the Nitmiluk Gorge river cruise and other gorge activities.
Mataranka: swim in the Bitter Springs (perhaps the most beautiful clear water in all of the NT) and take a dip in the Thermal Pools. You can visit Mataranka as a day trip from Katherine or stay somewhere like Bitter Springs Cabins, just a short walk from the springs.
Kakadu: stop in for a swim at Leliyn (Edith Falls) on the way to Kakadu and then head to Cooinda/Yellow Water Caravan Park, which has a beautiful pool and comfortable restaurant and bar. Walk or drive the one kilometre to the Warradjan Cultural Centre. Get the shuttle bus from the campground to the Yellow Water Cruise to see an array of flora and fauna including crocodiles and various species of birds. Hike around the two major rock art sites at Burrungkuy and Ubirr. Stop in at the Bowali Visitor Centre and then head onto Jabiru, where you can see the old Crocodile Hotel. You could make Cooinda your base for your entire stay in Kakadu, or you could spend a night in Jabiru at somewhere like Aurora caravan park. All the above locations in Kakadu are accessible via sealed roads. Unfortunately the camper van can not be used on any unsealed roads (it is fitted with a GPS tracker - insurance is rendered void and the hire cancelled if the van is taken off-road). However, if you wish you can book a day trip on the ‘G1 - Spirit of Kakadu adventure tour’, which will pick you up from the Cooinda Caravan Park and take you to four-wheel-drive accessible locations.
Darwin: on the way back to Darwin, stop in to see the jumping crocodiles. Powered caravan sites are available in Darwin at a number of nearby parks including the Free Spirit Resort or Discovery Holiday Park. A few great things to do in Darwin include:
Movies at the Deckchair cinema (arrive early for outdoor dinner as the sun sets),
Feed the fish at Aquascene,
Enjoy Leanyer’s free water park or swim in the Waterfront lagoon (also free) or wave pool,
Shop at Mindil Markets (Thursday and Sunday nights in high season only), Parap Markets (Saturday morning), or Nightcliff Markets (Sunday morning),
Watch the sunset with a drink and feed at the Ski Club, Sailing Club or Trailer Boat Club in Fannie Bay, or with fish and chips on the grass at La Beach Cullen Bay,
Eat out at Lola’s Pergola on the marina, Italian at Alfonsino’s, Korean at Little Miss Korea, Mexican at Hot Tamale (happy hour 4-6pm every day), Thai at Hanuman, all you can eat at The Jetty Restaurant or super duper fancy at Pee Wees.
Have an evening drink at Charlie’s, Babylon, Stone House, Hanky Panky, or Doms.
See more crocodiles at Crocosaurus Cove or Crocodylus Park,
Enjoy the exhibits at the Museum and Art Gallery Northern Territory and see local art at the nearby Tactile Art Gallery or the Paul Johnston Gallery, Outstation, Laundry Gallery or the Northern Centre for Contemporary Art (the last three are all on the same block).